Showing posts with label DIY. Show all posts

October 18, 2013

Why Not

\


top: Old Navy (DIY)
jacket: Loft
skirt: thifted
shoes: TJMaxx
purse: Old Navy 
Sometimes I find a piece of clothing that I wear all the time. It's comfortable, goes with lots of colors and can be dressed up or down. Case in point, this skirt.
Yes, I found this skirt for mere $4.99 but the quality of wool and lightness of the fabric, as well as the fit is just perfect. I've worn this skirt almost every day for the last two weeks. And why not? 

Sometimes, you put together a perfect outfit and who said that you can't wear it over and over again? The fashion police is not going to come knocking on your door if you wear the same outfit for a week. Because if it really works and makes you feel great, that's all that matters.

P.S Check back later today for the how-to on this jeweled top. I did do this myself.

Hope you have a great weekend! 


September 10, 2013

Change For Better


top: The Limited
skirt: Calvin Klein
shoes: Kate Spade
clutch: DIY
glasses: DKNY
As part of Blogtember  today we are supposed to describe a distinct moment when your life took a turn. 
I have to say that the most dramatic point in my life was switching continents. One thing is to move to a country that's very similar to yours, has the same language or at least you feel comfortable in. 

Another thing is to move across the globe (with only eight suitcases for a family of four), learn a new language (start a blog in that language), get yourself accustomed to mew culture (what's Seinfeld? how do you play baseball?), change all your eating habits (gain 15 pounds while you at it) and still succeed doing all that and more. It definitely changed my life. So far, it has been a change for better and I'm grateful for it

On a totally different note...

Sometimes it's hard to be a style blogger and not to feel like everyone else has stylish and latest clothes while you do not. I mean, my budget is very limited. 
I've been trying to style my clothes in a new and exciting way, while drawing inspiration from all the great bloggers out there. I'm also doing couple DIY projects and re-organizing my closet.

Saturday I did a MAJOR closet clean out and got moved all the clothes that I don't wear or don't like anymore out. It was a monumental decision.
I'm going minimalistic.

Basically everything I haven't worn in a year has gotten tossed, and everything that I still like but can't fit into yet was put away into summer clothes box. The clothes that I love but are too big got put away into maternity box (yes, probably going to have more kids).

My sister came over to do some 'shopping' in my closet, and I'm selling the rest of it here. Maybe you would like to Shop My Closet and score some great deals?
Hope you are being inspired by all the stylish bloggers out there while re-mixing your clothes in a new  and exciting way.
Have a great day!


August 5, 2013

Winding Down


top: Talbots
skirt: Thrifted
heels: Ann Taylor
clutch: DIY
necklace: Forever 21

According to the calendar, it's almost the end of summer and New York haven't even had real summer yet. We had non-stop rain the entire month of June, then it warmed up a little. But all the rain made the humidity get out of control, so that the only possible way of survival was inside, under an air conditioner. 
By the way, a blessing I am extremely thankful for is the central air conditioning system.
 It's absolutely amazing. I'm giving props to all the people who don't have A/C. I don't know how ya'll live.

We started having gorgeous weather last few weeks and now the days are warm and nights are cool. It's really beautiful out and yesterday was one of those days. We enjoyed it mostly by going to church, staying inside and (not) taking a nap because a certain someone with cutest chubby cheeks and beautiful grin decided that he will wake up every half an hour just to keep us on our toes.

Summer is winding down, so enjoy the beautiful weather by going to the park or having a picnic under a tree, take a bike ride or a trip to the beach. I know that I'm going to take advantage of this gorgeousness. 
Thank you for stopping by.
Have a great day!


January 30, 2013

Baby Boy Nursery


Ever since I found out that I'm pregnant, I've been working on ideas for the nursery. Sometimes, I would lay sleepless during the night and think what I would like to do. I've been gathering materials ever since we got married - those sheep that I bought almost 5 years ago, Russian cartoon characters my mom brought from motherland and books that I read when I was a little girl. 
My first thought was to make it navy blue and green. I wanted an accent wall and was looking for wall paper. So when I found this striped teal number, I absolutely loved it and changed my mind about the colors. 
Teal walls and bedding with brown furniture seemed a little boring. So I added a pop of color with subtle orange accents. 
I LOVE the end product and very often go sit in my favorite chair (it reclines, rocks and swivels! I received it as a Christmas present from hubby) while reading. 
He really is so amazing, kind and the best kind of good. 
Did I mention it's the warmest room in the house? Yep, nice and cozy!

Crib: Pottery Barn Kendal Fixed Gate Crib
Dresser: Ikea MALM 4 Drawer Chest
Bedding: Pottery Barn Harper Bedding
Standing Lamp: Walmart DIY (Spray painted colored that I wanted)
Mommy's Chair: Natuzzi Liri Leather Recliner
Clock: Target (sold out)
Table Lamp: Target
Bassinet: Gift (Target)
Changing Table: passed down from my sister
MobileDIY
"I Love You" PrintsLa Posh Design (custom made)
FramesHobby Lobby
Rocking Horse: Vintage (handmade present from our neighbor)


January 7, 2013

Little Lamb Nursery Mobile (DIY)

 It Has a Story

I have been on a hunt for a perfect crib mobile for a while. First of all I didn't want a zoo-themed nursery and nothing with monkeys either. I wanted something simple yet elegant and boyishly cute. 
The very first year my husband and I were married, I was shopping some post-Christmas sales and found most adorable sheep at Bath and Body Works, of all places (go figure). They had mamma sheep and two little lambs, with a matching lamb blanket. I knew then and there that whenever we decide to have a baby, I would love to have some lambs in the nursery.
 So I bought them, kept them for four years in the back of my closet and now I'm so glad I did.
So I had these plush big sheep but no mobile to match it. This mobile was the closest I could find to something that would match the room colors and style of the nursery. But paying $62 for a mobile (you have to buy the arm separately) was a bit ridiculous. I was already getting some nice (i.e. expensive) bedding so that price was not for me. 
Of course, turning to PINTEREST and Etsy (also too expensive) I decided to make the mobile myself.
 But then there was the issue of little lambs (kind of the most important part of the whole thing). I couldn't find any that would be the perfect size for a mobile until my sister gave me her Christmas present.
She knew I wanted to add lambs into my nursery and found little ones (again) in Bath and Body Works. They were so cute and the perfect size! She gave me three little lambs, so I went to Bath and Body Works store right after Christmas and bought all the little lambs that they had. Eight in total, I had what I needed to make the most adorable mobile, and it was going to be one of a kind. 
Here is how. (Assuming you have the pieces to hang on your mobile)

You Will Need:
Pieces to Hang (It can be anything)
Scissors 
Embroidery Hoop (I used 10") from Hobby Lobby
Needle and Thread
Hot Glue Gun
Ribbon (I used golden 3/8")

Ready to start? 
So first I took all the tags and hooks off the sheep. Then using a needle and a thread, I sew single 20'' ribbons to them. My longest sheep was going to hang at 18" so the rest were just going to get cut. I this point I didn't know how many where going to be where, so I cut them all at the same length. 


And then I got tired of doing it all in quiet and all by myself and decided to watch some TV. And totally forgot to take pictures of the rest of the process. 
So much for a tutorial eh? 
Really, it's very easy so I'm going to tell you how. 
Once all the ribbons are sewn unto the sheep, I started to approximate how long I wanted the pieces to hang. At this point it's up to you, where and how you want them to hang. The longest were about 18'' and the shortest were 8''. So I glued two longest sheep across from each other, with about 2" difference in height. Then I started eyeing where to put the rest. Again, depending on the number of pieces you have and diameter of the ring, it's your call. Mine were about 9'' apart.  

Then I started gluing the ribbon to the ring, on the inside and outside part (just to make sure). 
Now its time to make the part you going to hang it with. I used four 10'' long pieces of ribbon. Spacing them out as evenly as I could hot gluing to the inside of the ring, I joined them in the middle, also with hot glue. Then made a hoop 5'' long.
Now that all the parts are glued to the ring, it's time to cover up some of the ugliness of the glue. 
I used brown (since it's one of the colors in the nursery) ribbon 1'' thick and hot glued it to the outside and the inside of the ring. Again your call on the color. 
And that was it.
I could be happier with the way this mobile turned out and honestly, every time I walk into the nursery, I love how sweet it looks. It must be my favorite piece of decoration in the room.
(Next time I will pay closer attention and snap some more pictures)
I want to wait until the entire nursery is finished to show you how it looks in the room.


October 30, 2012

Little Man's Nursery


I'm currently working on the "Project Nursery" and honestly, feel a little lost in the sea of Pinterest pins and Google images. My idea of boy's nursery is somewhere between manly, cute, practical, and stylish. I want it to be a relaxing space but at the same time I don't want any frills or soft blues. The room should be boyish enough to transform into toddler room but at the same time, baby enough to make your heart drop into your knees every time we walk in to pick up our little man.
Here are my top picks and design ideas for the Little Man's Nursery

August 10, 2012

{Headband}


As I said earlier, I will try to keep up with DIY projects and post every other Friday. So I was excited to get started and kind of went all the way on this one. It cost me more then usual because I mostly buy very cheap stuff. This time I wanted to make a present and bought some of the nicer accessories. You can make this any color and mix and match, but I wanted something a little sophisticated and grown-up.
 Here is it!

You will need:
Black Chiffon - 1rd x 1/2 yd
Felt
Hot Glue Gun
Scissors 
Black Headband
Jewelry Accessory

Start out buy cutting the same size circles out chiffon. Let me tell you - chiffon is pain in the neck to work with, so stack the pieces and cut about 3-4 at a time. You will need 8-10 circles.


Prepare your headband and the jewelry button.


Fold is circle in half by placing a very small amount of glue and then again. You will get folded quarters, but for every fold to stay in place you need to hot glue them.
Start centering the pieces around the middle of the circle felt you cut out. 


Glue the quartered circles unto felt by placing four in each row.
Repeat until you reach the desired amount of layers. I made two layers


Cut the edges of the chiffon very carefully making a nice circle, then burn the edges just a little. Be careful not to burn wholes into the chiffon.


Glue the middle press tight on the middle for about 30 seconds. Then hot glue the felt unto headband and if you have black felt, you are done. I didn't want the beige felt to show, so I covered it with another piece of chiffon. You very own, custom made head piece is done! 


Enjoy!

August 3, 2012

{Crafty Friday}

The DIY idea comes from Hey Gorgeous Blog and I absolutely love it.
{all pictures are courtesy of Hey Gorgeous Blog}
I know that you guys just love seeing me pose and model clothes (smh?) but I want this blog be more then just about clothes. So I'm starting a new thing here - Crafty Friday. 
Every Friday I will try to give you a crafty idea that I have tried or think is worth sharing. I have done couple DIY projects but wanted to get creative and add more personal touches to everything from wrapping presents to making a girly headband. 
My sister had her baby yesterday and Zoe is my first niece. My mom is making a baby room in her home for when she (and her future grand babies) comes over. Something like a mother-baby room where you can nap and keep all the baby supplies. It's small but so very cute. 
I am making a crib mobile for the room that's lime green and yellow. The mobile is going to be different shades of orange but depending on what you are going to use it for, it can be a different color(s).

June 8, 2012

Sequin Clutch (DIY)


I gave my red clutch a little make over. Let's face it, the clutch needed it BIG TIME. Couple of weeks ago I bought a sequin skirt but just never got up the courage to wear it because well, I don't go clubbing. It was on clearance for $5 and just didn't seem to fit right (I realized when I  got home). So I decided to make a new purse for myself. It wasn't a hard project and took me only about 30 minutes. Here it is.

Inspiration
Christian Louboutin
Prada


Materials:
- old clutch, purse
- sequined material (depending on the size of the clutch)
- glue gun
- glue sticks
- scissors


HOW TO
Clean the clutch and measure how much material you need. Warm up the glue gun and cut the material appropriate to size. Leave about 2 inches seem allowance or as much as you need to cover the entire clutch.


Carefully start gluing. I started with the seem and matched it with the bottom of the purse so it looks more professional.


 I completely glued down the sides before taking care of the side seems.


Cut the edges nicely and make even seem with sequins folding on each other. Glue the sides and tuck in the bottom corners.


Start gluing the inside. Fold the material in and glue it under the zipper with a little glue.
  ***Careful not to drop glue on zipper - you will ruin it.***


Glue the corners in very carefully and press them down for a minute.

After gluing everything down, put something heavy on top for couple of minutes to make sure glue sets.
Ta-Da!


Thanks again for reading and commenting!

May 22, 2012

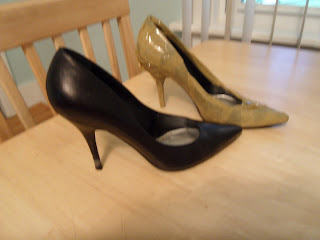
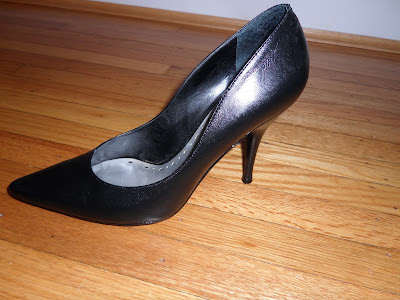
Black Pumps (DIY)

My very own Valentino pumps (a girl can dream right?)
I love designer shoes but unfortunately they cost more then our rent. So what should I do? Try to fashion a pair from my old, broken-into, super comfy and dear-to-my-heart black pumps. I wanted a pair that was lady-like, cute and timeless like these to-die-for shoes.

 <-Inspiration ->
                    
                                     Manolo Blahnik 

         Valentino


YOU WILL NEED:
- pair of black pumps (use something that you won't cry over if you mess up)
- spray paint (black)
- tape
- all surface paint
- paint brush
- small bowl
- lots of newspaper to spare your working surface
- black chiffon (4 strips 3'' wide, 2 strips 2''wide)
- needle with black thread
- 2 clothes pins
- hot glue gun

HOW TO:
Set up your working station and make sure to cover it with paper.

Cover the shoes and spray paint just the soles black (take the outdoors). Remove the tape. 

I didn't spray paint mine since they were already black. But if you have lighter sole, it's really hard to trace the shoes with brush, so just save yourself some headache and spray it. 

Next paint the shoes with the high gloss paint and let it dry. I did three coats, as my shoes were a little worn out.


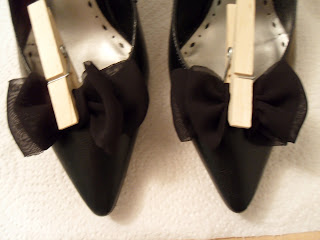
Make the bows for the front. Those can be as big and fluffy as you would like them to. Take a piece of wide chiffon and make a bow. Sew in the middle to hold in place and do the same with second layer. Wrap around the middle with smaller piece of chiffon and secure with thread. I like to sew them because glue may not hold all the layers. 

 They may not look exactly the same, don't worry:)

Take a little hot glue and secure the bows in the middle of the front of the shoes. To make sure that the bows are secure, hold them in place over night with clothes pins.
Note: Less glue the better - you can always add more and it will give your shoes more professional look.

Give the shoes some time to dry and set. 
Ta-Da! 

Thanks for reading!


BLOG DESIGN BY BELLA LULU INK